I'm so excited to be sharing my board and batten tutorial with you today. I finished this project in November but haven't had time to get the post up on the blog until now.
I love board and batten! I love the way it brightens up the space and adds detail to a plain wall.
Before
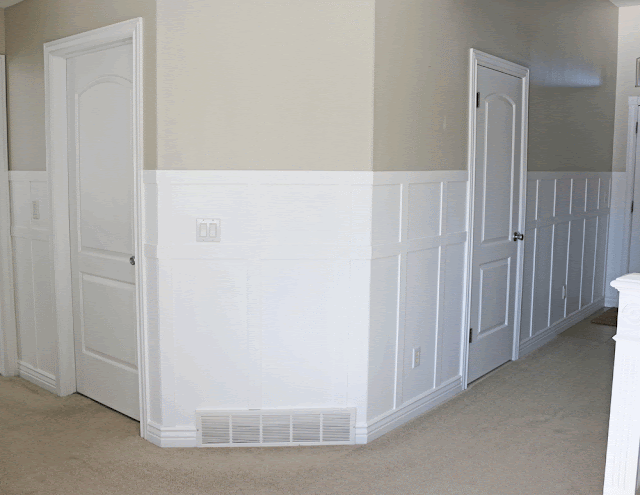
After
These poplar boards from Lowes are the ones I used for this project. I wanted to use the same ones that I used in my entry. They are .25 thick x 2.5 wide x 4 feet long. I like these because they are the same thickness as my baseboards so they sit flush at the bottom where they meet together. I also like the thickness and the height is perfect at 4 feet tall.
This project does require a few power tools.
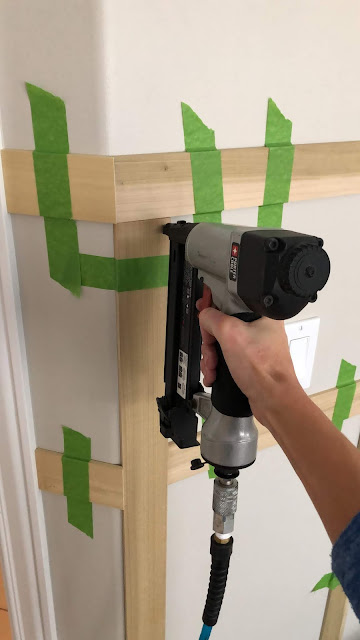
I used a miter saw and a brad nail gun.
Also a screwdriver to take off the light switches and tape so you can tape up all the slats before nailing them to the wall, as you can see below.
Paint
Caulk-this is a very important step!
You will need to caulk around all the boards to make them seamless. I just use my finger and a wet cloth to wipe off any excess caulk. Let your caulk dry then you are ready for paint. I start with the corners and edges and paint them with a paint brush then used a small roller from smooth surfaces to paint the rest. It took a few coats to cover the wall color-which is Benjamin Moore, Revere Pewter. this is seriously the best wall color! I repainted my whole house a few years ago and never looked back.
On the corners I cut it the best I could then I used my sander to round the corners. These little details make a huge difference in the outcome and look of the board and batten.
Use your caulk to fill in all the nail holes and sand if needed. I didn't sand because right after i filled each hole I wiped it clean with the damp cloth.
Go ahead and nail all boards in place then remove the tape.
Isn't it looking good already?
Now its ready for paint. I used a paint and primer in Bright White in Satin from Lowes.
See how it continues from the other wall down the hall.
All finished! Whew. I was able to finish on the third day before my kids got home from school. They walked in and said "wow Mom, you've been busy, It looks really good!"
I've got my kids well trained in the compliment department.
I'm so happy with how it tuned out and makes the wall feel finished. not to mention brighter and more interesting.
I was able to replace the light in my hall from dark bronze light to this pretty polished nickel beauty from Build.com I got it for a great price and its really good quality. I installed the light myself and it was so simple to do. It makes the space so much brighter and more up to date.
Let me know if you have any questions! Thanks for being here, have a great day!
-L I N D S A Y


No comments:
Post a Comment