
Thursday, January 8, 2015
2nd Birthday Flower Party
I can't believe that my little girl is 2! I was okay with her turning 1 but not 2! For some reason 2 sounds so much older than 1. Time is just going by too fast and I just don't like it. Right now I have a 10 year old, 7.5 year old and a 5.5 year old and now a 2 year old. My little family is growing up.
I was going to do some sort of snowflake themed party for Whit on her 2nd Birthday. I just wasn't feeling it. I didn't want it to turn into a "Frozen party" because she doesn't even know what that is..."Frozen". I am sure in the next year she will totally want a Frozen party but for now I opted for flowers.
Yes, flowers in January.
I also didn't want to spend a lot on my decorations. I bought $10 of tissue paper and balloons. The tutorial for the tissue paper flowers is below. The are really easy and inexpensive!
 I should have taken a family picture before we got all crazy partying! We are a bit of a mess in this picture. And I don't like the lighting of night parties they turn out so yellow. Oh well.
 We were at Costco(the store I hate to love, because it takes all my money) the day of the party and just had to get these pretty flowers!! Oh and my new lovely white Target vase.
 Ignore the fan please and just look at the flowers and white lanterns.

 Paper flower tutorial
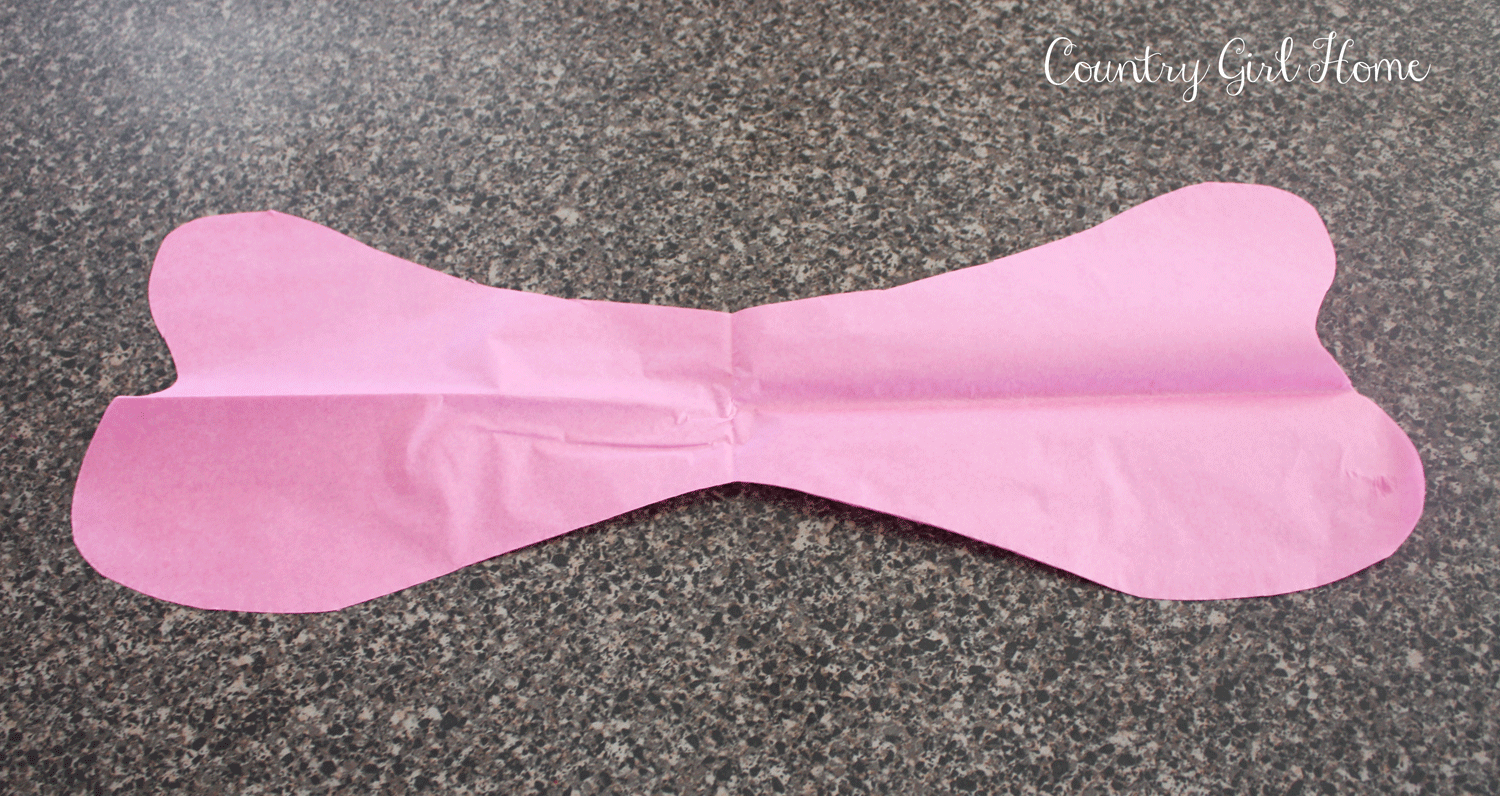
I bought different color tissue paper and unfolded it one time. Then cut out a petal shape with the fold at the bottom so when you unfold it you have a weird dog bone shape (pictured below)

 Separate all the sheets of tissue and lay them in a t then an x shape on top of that. So I have 4 tissue papers laying down in the picture below you can add more if you want a fuller flower.
 Then take another color in a smaller petal shape and repeat then I cut two small square or circles and scrunch them up and add to the middle of the flower. Then I scrunch the whole flower to make it a little less perfect.
 Then scrunch and twist the center/bottom of the flower to create a cone that you will tape together.
 Then arrange the petals how you like them and hang them up with tape of fishing line. That's it!


 By all means I am not a baker! Really, this is not the prettiest cake I have ever seen, but it was good enough for my little girl. Next year I will have one of my sister-in-laws make the cake :)
 Happy Birthday my sweet little girl!
I can't believe that my little girl is 2! I was okay with her turning 1 but not 2! For some reason 2 sounds so much older than 1. Time is just going by too fast and I just don't like it. Right now I have a 10 year old, 7.5 year old and a 5.5 year old and now a 2 year old. My little family is growing up.
I was going to do some sort of snowflake themed party for Whit on her 2nd Birthday. I just wasn't feeling it. I didn't want it to turn into a "Frozen party" because she doesn't even know what that is..."Frozen". I am sure in the next year she will totally want a Frozen party but for now I opted for flowers.
Yes, flowers in January.
I also didn't want to spend a lot on my decorations. I bought $10 of tissue paper and balloons. The tutorial for the tissue paper flowers is below. The are really easy and inexpensive!
I should have taken a family picture before we got all crazy partying! We are a bit of a mess in this picture. And I don't like the lighting of night parties they turn out so yellow. Oh well.
We were at Costco(the store I hate to love, because it takes all my money) the day of the party and just had to get these pretty flowers!! Oh and my new lovely white Target vase.
Ignore the fan please and just look at the flowers and white lanterns.
Paper flower tutorial
I bought different color tissue paper and unfolded it one time. Then cut out a petal shape with the fold at the bottom so when you unfold it you have a weird dog bone shape (pictured below)
I bought different color tissue paper and unfolded it one time. Then cut out a petal shape with the fold at the bottom so when you unfold it you have a weird dog bone shape (pictured below)
Separate all the sheets of tissue and lay them in a t then an x shape on top of that. So I have 4 tissue papers laying down in the picture below you can add more if you want a fuller flower.
Then take another color in a smaller petal shape and repeat then I cut two small square or circles and scrunch them up and add to the middle of the flower. Then I scrunch the whole flower to make it a little less perfect.
Then scrunch and twist the center/bottom of the flower to create a cone that you will tape together.
Then arrange the petals how you like them and hang them up with tape of fishing line. That's it!
By all means I am not a baker! Really, this is not the prettiest cake I have ever seen, but it was good enough for my little girl. Next year I will have one of my sister-in-laws make the cake :)
Happy Birthday my sweet little girl!
Monday, January 13, 2014
1st Birthday!!
As most of you know I have 3 boys then last a girl. I have loved doing my boy themed Birthday parties, but it was time for something other than boy. Now that I have little girl, I get SO excited to do PINK girly things.
Here are some pictures of the big event.
I let the boys help me with the decorating. They might have had as much fun as I had.
I let the boys help me with the decorating. They might have had as much fun as I had.

I took some First Birthday pictures for her scrapbook. She had been teething and not in a great mood But I had to get some pictures on her birthday. I gave her a pink bubble gum sucker, hoping it would cheer her up. It worked!! Instant happiness! Thank goodness.


The rose "Smash Cake" Made by my ultra talented sister-in-law Laura. It was so pretty, I had hard time letting her smash it. And the darling little cake stand lent to me by my other talented sister-in-law Cherie over at www.cherieamour.blogspot.com. They both made the perfect touches to a darling birthday party!

Homemade Chocolate covered Strawberries

Homemade Chocolate covered pretzels. Easy and yummy (I had to hide them from my family)

Pink Rose Cupcakes

Raspberry Sherbet and sprite

The desert table

Me and my Birthday girl!
I cut out a bird silhouette and used Stich Witchery-(iron on stitching) to adhere it to her Onsie. I should have taken a better picture before the smash cake, It was covered in frosting!!

Tissue paper flowers. I just love these. They only cost $1 each. They are really easy and cute! Hung them with fishing line.

Her birthday Crown. I made it out of paper, ribbon and sparkles

More 1st Birthday Pictures... Oh I just love her!

I used strips on fabric, lace and ribbon to make a garland to tie around her highchair.


Let the cake smashing begin! She was not as crazy as my boys have been on their 1st birthdays. She did get it all over in her hair and all over her clothes. She had a good time.

My little birthday helper

It is good to have a birthday in January to look forward to.
This little baby girl has been such a blessing!
Happy Monday to you all!
Thursday, August 23, 2012
NINJAGO Birthday party
Okay my 8 year old son is crazy about NINJAGO anything. So as you can see that is what he picked for the theme of his party. Thank goodness for the web,. There is not a ton of places sell Ninjago party stuff, so I had to rely on pinterest and other sources to make my own.
I just typed in "free Ninjago printable s" on BING and all sorts of pictures pulled up. (including coloring pages that kept my kids busy while I did all this).
These are the three main ones I used. You can buy personalized invites on Etsy but I am way too cheep for that. So I just saved these pictures to my Photoshop and then sent them to Costco in the sizes I wanted which was way inexpensive 13 cents each 4x6 and the quality was really good. This is the picture I used for the invites. I printed out the party information with this cool Asian font "Japonesa" from DaFont.com I got all the info from Jaimee at Craft, Interrupted.com

The invitation really set the mood for the party and tells people what your kids is interested at that time for gift ideas.

These were so easy and inexpensive.

I got wallet sized pictures of these(above) and put them on red bags from the dollar store.


I used this picture (below) for the eyes on the balloons. Cut along where the yellow and red then taped to the different color balloons.


I got a TON of ideas for this awesome mommy she was super creative and very helpful and even gives a few printable of her own, that I know took some time. Like this one below for cup cake toppers SO CUTE!!! Be sure to check out her site it really is AWESOME!
Again it is
http://www.craftinterrupted.com/

(This printable is from her site so be sure to go check it out.)
Here are some fun games we played. I tried to use what I had around the house. These are Pringles cans covered in paper and we topped with balloons and the kids had to use their ninja stars to hit them off. I made so many origami Shurkins (ninja stars) and then spray painted them silver.
Here are some fun games we played. I tried to use what I had around the house. These are Pringles cans covered in paper and we topped with balloons and the kids had to use their ninja stars to hit them off. I made so many origami Shurkins (ninja stars) and then spray painted them silver.

This was a huge hit! We used darts to hit the balloons it was so fun and it got harder as more got hit.

I used red plates and silver table cloths. I made these swords out of paint sticks yes! people paint stir sticks!! we painted them silver then used electrical tape for the handle made it a little thicker at the top and bottom. The kids had some serious sword fights with these and they didn't hurt anything or anyone.


Here is the set up..Don't laugh at the cake. I am not a baker by all means. I had no idea that it didn't matter how much RED food coloring you put in your frosting it wont be a deep red! I learned so this cake was a little more bright reddish/pink.

Here are our little ninjas! For the headbands I just used muslin I had on hand and cut them into strips. Each kids got a gift bag, a ninja balloon, sword and ninja star to take home.

Thanks for visiting!!
Tuesday, August 7, 2012
Star Wars Birthday
For my sons 5th Birthday he wanted a STARWARS themed party. So I quickly got to work before he changed his mind. I bought the Starwars plates, cups and napkins.
These are the goodie bags all the kids went home with. Inside each had 2 light sabers (small glow sticks from Target) gumballs, Starwars fruitsnacks and stickers. Each had a saying "may the force be with you" and their name "Jedi Jake"

Sorry this is a really bad picture but you'll get the idea. My boys were determined to put their Star Wars Legos on the table for decoration so here they are. Each kids got a bubble stick light saber too.
I have no idea why I can't turn this picture!!

We had pizza to eat. Here are some JABBA JIGGLERS made from green and blue jello

I just used stickers from Walmart to make the cup cake toppers... easy peasy!!

Vanilla and chocolate OREOS for the WOOKIE COOKIES!!

Each kid got their own light saber from a pool noodle. Cheap and safe and easy to make just cover the bottom 6 inches with silver duct tape, the kids decorated theirs with stickers. and then we had some fights as you can see below the one that fell off the beam was out and the other went to the final round until only the greatest Jedi was left.

Each kids was able to make their own YODA necklace. I made these up so don't laugh. The kids loved them! I just drew up a pattern and then went to the dollar store and got sheets of these foam sheets and cut and hot glued my yodas together added some googley eyes and tada Yoda necklaces..

The kids loved making their necklaces, I had to finally tell them we had to move on to other stuff.
(I got the beads at Joanns for $1 a pack)
(I got the beads at Joanns for $1 a pack)

Happy Birthday to my sweet little 5 year old!
(his party was in June but I am just now feeling good enough to do some posts)
and....
"May the force be with you!"
(his party was in June but I am just now feeling good enough to do some posts)
and....
"May the force be with you!"
Friday, September 16, 2011
A bug party!
Until my computer is up and running I will post my some pics of my sons birthday party. Thank goodness I had these pics on my moms computer. My son doesn't really like cake that much so we did cup cakes. Dirt and worm cakes we called them. I asked him what the names should be for all the things we made, it was fun for him to come up with them.
My 7 year old son LOVES, bugs critters or anything that creeps or crawls. So for his 7th birthday party we did BUGS! bugs were everywhere!We put plastic bugs from the dollar store in jars with lables.


The birthday boy covered in bug spray!

The poor boys was exhausted after all the kids had gone, that means he had a good time!
Each boy got to take home a "pocket full of WORM wishes"

No comments:
Post a Comment