Tuesday, November 29, 2011

Natural Christmas!

I wanted to do two totally different trees this year. This is in my basement right now but started out up stairs. Until my son freaked because there was no red on the tree, even my husband asked "Is that the tree your keeping up here?" they weren't being rude. they were missing the christmas red!! I had no idea my boys loved my other tree so much. So down stairs this one went and up came my red tree that I'll be showing a bit later.

 I got the awesome large burlap garland at Joanns it is realuarly $8.99 for a lot of it probably 10-15 feet but I used a 40% off coupon for it. The main colors are green, cream, white gold and the yellow/greenish pears that are oh so sparkly!!
I wanted to make some fantastic tree skirt all rufflishis but haven't had time so i just cut a 4 foot strip of burlap and pulled one of the thread to gather the fabric and tied it together- really technical I know!

 I didn't hang my shutters outside this year but I did inside on my basement windows and then hung these little wreaths for winter.
 more tree pictures....
I got some cream sparkle tulle for the fabric you see here they are about 10-12 inch strips thick and about 10 feet long you just weave them through your tree. easy peasy!

If you have ever been to Tai Pan Trading they use these large clumps of ribbon greenery and sparkling things tie them together and stick them in the tree. This is how I do my large clumps of ribbon and stuff.
I am excited to so you more christmas stuff more is on it's way!
Thanks for stopping by :)
Lindsay

Tuesday, November 22, 2011

Darling GRATEFUL sign

 I wanted to post this it is from my cute sister in laws blog. Catherina from Catherinas Creative Corner, she is going to be on STUDIO 5 today at 11:00AM for those of you in Utah. Check it out she is SUPER talented and this is such a cute and easy project.
http://catherinascreativecorner.blogspot.com/2011/11/thanksgiving-nonot-christmas-yet-though.html

She did all this beautiful writting herself-I LOVE IT!! and check out the brown "paper" it's not paper it is the cardboard from the back of the picture frame.. so creative.
Check her blog out you'll be glad you did.
Thanks Cat for sharing.
-Lindsay

Monday, November 21, 2011

Table re-do

Hello everyone good day to you all. Is it freezing at your house because it is at mine. I am never quite ready for winter, I LOVE snow but HATE the cold!! So I just might cozy up on my couch with some hot cocoa and prop my feet up on my newe little table..
 I was so excited when I came across this little honey at a thrift store the other day. I just had to have her. Look at those chunky legs-love it!! All I did was a new paint job and distress her a bit. She is feeling much better in her new home in my family room.

Never mind the christmas stuff in the back ground- and the little boy with the blurry face...(I should have cropped that out, but it is funny.)
                                                                        Before:
                                                                          After


I am still amazed at how much paint can transform something not so great into wonderfulness!!

Wednesday, November 16, 2011

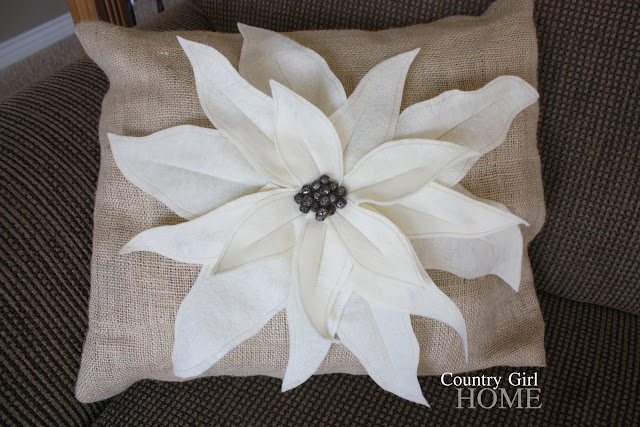
PB Poinsettia Pillow Knock off

Pottry Barn has this cute poinsettia pillow for only $29! But you can make it for WAY cheaper than that, I bought 3 sheets of cream felt and cut out my own petal patterns. I had a pillow and just made a burlap pillow case for it. The whole thing cost me under $5.
*I got the wonderful tutorial from STEPH from Crafting In The Rain http://craftingintherain.blogspot.com/2011/11/poinsettia-pillow.html


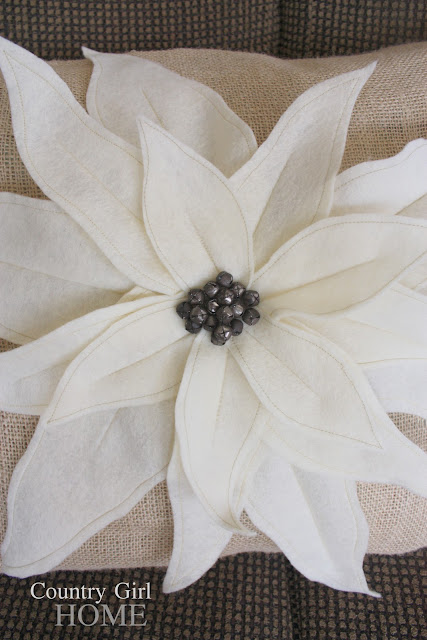
I layed the petals out to make sure they it on the pillow, then I sewed around the whole petal and down the middle to add depth. Then sewed them together and added the bells(bought them at joanns for .99 cents for a small bag of 15) The bells were bright silver but I wanted a toned down rustic brown so I spray painted them)
This is how my pillow turned out.
 Pottery Barns is not sewn around the petals but I thought it added detail.

And there you have it, a knock off PB Pionsettia Pillow for very inexpensive. Hope you all have a great sunny day.

Lindsay

Monday, November 14, 2011

Small table/bench legs add on.

Sorry about the name of this post it's a long one, but I wasn't sure what to call this little piece of furniture. So small table/bench fit the bill. Okay I LOVE chunky curvy legs-(for a table of course). I was at a local thrift store and saw this table I didn't need a side table and it's measurements were wierd but her legs were perfect. Legs are pretty expensive at Lowes and Home Depot like $15-20 a leg. So this table was a good deal for $10.


 Let me re-show you the life of this piece of furniture, a little entertainement center from RC Willey-so sad looking!! I cut it in half.
 To make a cute little bench for the end of my bed for storage too, You can never have enough storage people!!

After I unscrewed the bolts and used a circular saw to cut the legs down to the right height I wanted. (see they were just too long for what I needed, the table or bench what ever would have not been porportional for that size of table.)


Here is the little honey now she is lovin' her new set of legs!! They just add a little more character to a rather regular table/bench thing...

Saturday, November 12, 2011

Large wall clock re-do

 Redo of a large wall clock.

 I made this clock about five years ago at a church activity, and didn't really use it a whole lot. The circle was cut out of ply wood and then a plaster was put on top for tecture-(I dind't cut it out or add the plaster it was already done for me). I used a brown glaze then added the vynal numbers.
I wanted it to look older and more well, white or cream. I covered the whole thing with cream paint.
I drwew the lines on using a yard stick and a large bowl. I could still see the vynal numbers so I sanded just the numbers and then sanded to whole clock with 60 grit paper distressing it.


 I used push pins for the silver dots under the numbers and added my clock hands and walla! a new cream distressed clock.

Thanks for stopping by. Have a great day! :)
Lindsay

Thursday, November 10, 2011

Hanging pictures

I have had a ton of questions about how I hang my pictures. So here is the info.
My favorite things to use are these COMMAND STRIPS. I took some pictures to show you. These are for posters but there are other more heavy duty ones for pictures. Just buy the right size strips for the picture you are hanging.
 You have got to get some of these you will never put another hole in your wall for a picture! They are awesome!
 There are two strips that go together, and they both have little arm things that grab onto each other when you push them together you can hear them clicking and grabbing ahold-if you will. If you get your picture up and its not straight pull it off and try again. I have taken my pictures off tons and they are still going strong. I have removed some of the strips and if you pull them off liek the directions say at an angle they come off clean as a whistle.
This is in my sons room and there are 5 frames I didn't want 5 holes so I used the command strips.

 I swear my pictures are evenly space, this is a wierd angle.

The other way I have used which is different is using a picture rod. I got this rod at a store called ROD WORKS, they are only located in Utah, Las Vegas NV and Gilbert Arizona so if you live by those your in luck. Here is an example.

so those are some of the ways I hang my pictures.
Thanks,
 Lindsay

Wednesday, November 9, 2011

Vintage button bracelet

So I have loved buttons since I was a little girl. My mom would go to craft stores and they had huge bins of millions of buttons and I would sit there and dig through them, oh my childhood memories.. anyway I was at my moms and came across some very old buttons and wantwed to make something with them.  So here is what I came up with.


I made one cream and a brownish grey one I LOVE them, I wear one everyday.
Thanks, Have a great day :)
Lindsay

Monday, November 7, 2011

Table tutorial

The rod above the table was purchased at a store called 
ROD WORKS
They now have an online store www.rodworks.com

Okay here it is my DIY table tutorial. If you have any questions please leave a comment and I will get to you asap. If you build this table please send me pictures I would LOVE to see what you build.


        ****I missed a few boards on this list below:****
               (Front): 2 (2x6's) 47" long
               (Back): 1 (2x6) 47" long
I layed it all out and ended up cutting off the legs they were too long so i cut them down to 32 inches(as listed) You can tweek your table to any measurement you would like.
I used glue and screws to put this together it will be more secure if you use both. You don't need a ton of glue just a bead down each board, screw it together and let dry.
Here is a good pic of the whole table and what it should look like during the process.


 This is it all assembled so you can see just how it is put together

This is so you can see the top slats, I used 2.5 inch nails to screw into the base.


I am not sure how much this table would have cost because I already had the wood, but it would be easy to price out at Lowe's or Home Depot. Just take the cut list and go to the store and see how many of each board you need (just pick out the straightest ones)They will also cut the wood for you to the lengths needed. I have had better luck at Lowe's they never charge me unless I have a ton of wood to cut.
If I had to guess I would say this would cost under $100.
(pretty good deal since you can't buy a good sofa table for under that.)

 I get my Walnut gel stain at Sherwin Williams its around $17.00 for a quart
Don't be timid when applying this gel, I just dump a blop on the table and start spreading until in is the color I want.
I use foam brushes to apply my gel stain (you can get a bag of about 8 at the $ store just make sure you throw them away outside and not in a closed container or by heat)
Good luck everyone!! Happy building. 
Thanks,
Lindsay

Thursday, November 3, 2011

My boys bathroom wall

Okay I have been slowly trying to figure out how and what I wanted to do with my boys bathroom for the last year I think I ahve finally decided on the colors of dark grey, brown and cream. I need to find a stripe fabric to make a shower curtain so when I do I will post it. But this is it for now. The bathroom is not very big so not much room for decorating, but here it is so far.
 I saw these cute twig stars in PB magazine last year and loved them so I made my own, with yep, you guessed it, sticks and a hot glue gun. really easy.
 I couldn't find frames in a greay color that I liked os I bought some at Michaels and spray painted them and added some burlap for the background of the pictures.
Thanks for stopping by. Changing my home is a never ending pleasure and I am glad I can share it with you. Have a great day I am so glad the sun is ot it makes me happy I just can't go outside cuz I know it is freezing!! brrrrrrrrrrrr!
Lindsay